
How to Clean a Pellet Grill: A Complete Maintenance Guide
The short answer
As an Amazon Associate, MeatLogic earns from qualifying purchases.
Clean the grates after each cook while they are warm, not blazing hot. Once the grill completes its shutdown cycle and becomes completely cold, empty the grease bucket as needed and inspect the drip tray. Every 20 to 24 hours of cooking, remove the grates, tray, and heat baffle, scrape grease with a nonmetal tool, and vacuum cold ash from the barrel and firepot. Clean the grease chute and exhaust path on a longer schedule or whenever buildup appears.
That is the core routine. The exact access points vary by model, so keep the owner's manual open for disassembly and approved cleaners. Never vacuum warm ash, spray liquid into the firepot or electronics, or bypass the programmed shutdown cycle.
You need a dedicated ash or wet-dry vacuum, a plastic putty knife, a nylon or bristle-free grill brush, paper towels, mild dish soap, and the cleaner approved by the manufacturer.

Why a pellet grill needs a different cleaning routine
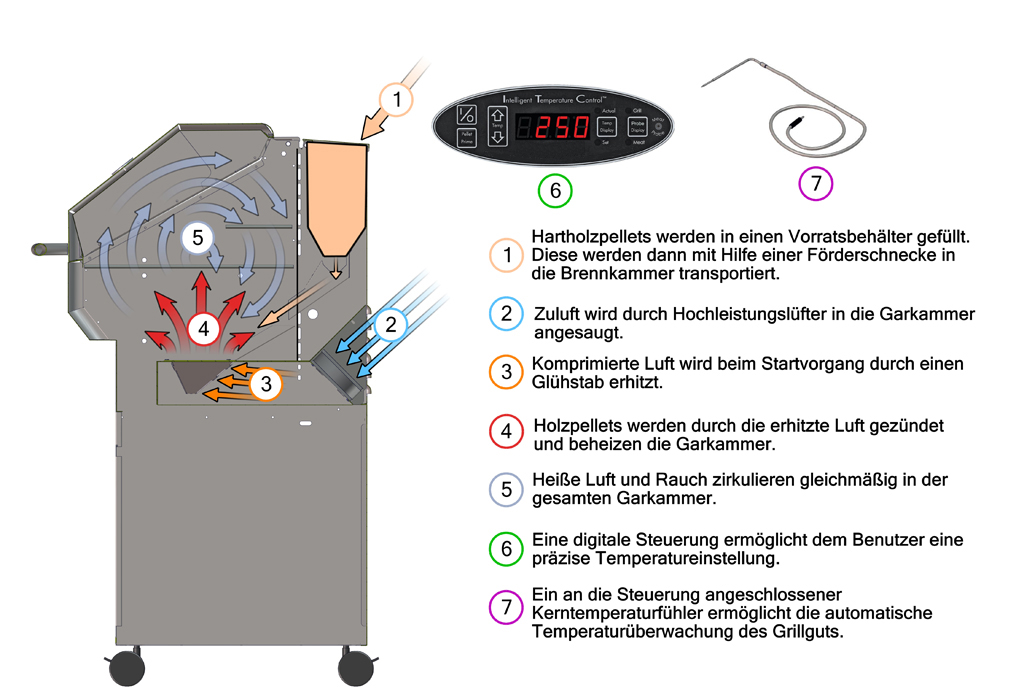
A pellet grill is a smoker, convection oven, grease-management system, fuel hopper, auger, fan, igniter, and controller in one appliance. Cleaning it is not the same as scraping a charcoal grate and dumping ash.
Wood pellets burn in a small firepot. A fan supplies air and distributes heat. A metal baffle spreads that heat, while a sloped tray catches grease and routes it toward a bucket or enclosed collection system. Fine ash settles below those parts and circulates when airflow increases.
Every layer affects the next one:
- Ash in the firepot can interfere with ignition and airflow.
- Grease on a tray can pool, ignite, and create hot spots.
- A blocked drain can send grease somewhere it was never meant to go.
- A dirty temperature sensor can make the controller respond to the wrong reading.
- Damp pellets and sawdust can feed poorly or jam the auger.
Cleaning restores the airflow and drainage the controller assumes are present. It also removes old grease that can make clean smoke taste stale.
A practical cleaning schedule
Traeger's support guidance, updated in April 2026, recommends wiping spills and scraping grates after each use, deep-cleaning the interior every two to three cooks or 20 to 24 hours of cook time, cleaning the hopper monthly, the exterior every three months, and the grease chute or downdraft path every six months. It also says fatty cooks may require earlier cleaning.
Use that as a starting point, not a universal warranty rule. Your model's manual controls. A cooker with an ash dump or combined grease-and-ash keg will have different daily steps than an older barrel cooker.
| Interval | What to do |
|---|---|
| Before each cook | Check grease path, bucket, drip tray, firepot, and obvious pellet overflow |
| After each cook | Complete shutdown cycle, brush warm grates, wipe fresh spills |
| Every 20 to 24 cook hours | Cold teardown, scrape tray and barrel, vacuum ash and firepot |
| Monthly during regular use | Inspect hopper, pellet dust, auger inlet, probe, gaskets, fasteners |
| Every 3 to 6 months | Clean exhaust, grease chute, exterior, lid deposits, and hidden corners |
| After storage | Inspect for moisture, mold, pests, corrosion, and swollen pellets before ignition |
A 14-hour brisket counts more than three 45-minute weeknight cooks. Track burn hours or learn the visual signs instead of cleaning by calendar alone.
Safety before touching anything
Let the grill complete its full shutdown cycle. That cycle burns remaining pellets in the firepot and keeps the fan running while the cooker cools. Cutting power early can leave fuel smoldering or make the next ignition less predictable.
After shutdown finishes, switch the grill off, unplug it, and wait until every internal part is cold. Check the firepot and ash with a bare hand held nearby before using a vacuum. If there is any warmth, wait.
Move the grill away from walls or railings only if the casters are cool and locked safely afterward. Work outdoors with good light. Wear nitrile cleaning gloves if you prefer, and change them before touching food.
Do not use a household vacuum that will later clean carpets. Fine ash can pass through weak filters, and grease makes the hose smell. A dedicated vacuum with a fine-dust filter keeps the mess contained.
Gather the right tools
The Team at MeatLogic uses a small kit that stays with the cooker:
- Dedicated ash or wet-dry vacuum with a clean fine-dust filter.
- Plastic or silicone scraper that cannot gouge coated metal.
- Nylon or bristle-free grate brush.
- Nonabrasive pads and paper towels.
- Small wooden stick or flexible tool for the grease chute.
- Bucket of warm soapy water for removable, manufacturer-approved parts.
- Food-safe or manufacturer-approved grill degreaser.
- Replacement drip tray liners if the manual permits them.
- A metal container with a lid for cold ash disposal.
Avoid steel wool on coated trays, oven cleaner unless the manufacturer explicitly approves it, and loose wire-bristle brushes. Abrasives scratch protective coatings. Strong caustic chemicals can leave residue and damage finishes. Loose wire bristles can become a food hazard.
Step 1: clean the grates
Brush food residue from the grates after removing the meal, while the metal is warm enough to release residue but not hot enough to burn you. This is the one cleaning task that happens before the cooker is fully cold.
Once cold, remove the grates and inspect both sides. Porcelain-coated grates need a nonmetal brush and mild cleaner. Bare stainless grates tolerate more scrubbing, but the manufacturer's method still wins.
For stubborn grease, soak removable grates only if the manual allows it and the material is not cast iron. Dry completely before reinstalling. Cast iron needs a different routine: scrape, wipe, dry with heat, and protect with a very thin oil film.
Do not leave greasy grates in a sink overnight. Water reaches chipped edges and seams, and the next cook begins with diluted old grease rather than a clean surface.
Step 2: remove liners and scrape the drip tray
Lift out any disposable liner and discard it after the grease is cold. Never pour rendered fat down a household drain. Seal it with trash or follow local grease-disposal rules.
Scrape the drip tray downhill, following the direction grease is supposed to flow. Use the plastic putty knife at a shallow angle. Remove thick flakes and pooled grease without trying to polish the tray to bare metal.
If using foil, fit it smoothly and keep it from wrapping over airflow gaps. Wrinkles can trap grease. Foil that extends beyond the tray can interfere with heat and drainage. Preformed liners usually sit more consistently, but only use one designed for the model.
Traeger's current hot-spot guidance specifically warns that wrinkled foil can collect grease and that blocked edges can obstruct airflow. A clean-looking liner is not useful if it changes how the cooker breathes.
Step 3: clean the grease channel and bucket
Follow the tray to the drain, chute, or grease tube. Push cold buildup through with a nonmetal tool and collect it at the outlet. Do not force a sharp metal rod into a bend where it can puncture thin steel.
Wash the removable grease bucket with hot soapy water, or replace its liner. Inspect the hanger and outlet for leaks. On cookers with a combined grease-and-ash keg, follow the model-specific separation and disposal instructions.
Grease should run smoothly downhill. If it pools during a water test allowed by the manufacturer, confirm that the grill is level, the tray sits correctly, and the liner has no dams or folds.
Never pour water into a warm grease system. Steam and splatter can cause burns, and water in the firepot or auger creates a new problem.
Step 4: remove the heat baffle
Photograph the installed orientation before lifting the baffle, especially on a new grill. Some plates have a definite front, back, top, or engagement tab.
Scrape loose carbon and ash from both sides. The goal is an unobstructed, intact heat diffuser, not a showroom shine. Dark seasoning on solid metal is normal. Thick flaky deposits that can fall onto the firepot or block airflow should come off.
Inspect for warping, burned-through areas, and severe rust. A damaged baffle changes heat distribution and should be replaced with the correct part rather than flattened aggressively.
Step 5: vacuum the barrel and firepot
Confirm again that the ash is completely cold. Fit the vacuum with its fine-dust filter. Remove loose ash from the barrel floor first, then clean around and inside the firepot.
Pay attention to the firepot's air holes. They need to remain open so the fan can support combustion. Vacuum loose debris rather than driving a metal pick through holes and damaging the pot.
If the firepot contains a pile of unburned pellets, do not simply vacuum and restart. An ignition failure, power interruption, damp fuel, or early shutdown may be the cause. Clear the fuel, inspect the igniter and airflow according to the manual, and solve the reason it overflowed.
Traeger's current grill-fire guidance says pellet fires are caused by a large buildup of pellets in the firepot, while grease fires commonly begin on a dirty drip tray. The same cleaning session addresses both paths.
Do not spray degreaser into the firepot. Liquid around the igniter, wiring, or auger tube can cause corrosion and electrical trouble.
Step 6: scrape the lid and barrel
Black flakes inside a smoker lid often look like peeling paint. They are commonly layers of smoke and grease that have dried and begun to release. Remove anything loose with the plastic scraper and vacuum the flakes.
Wipe greasy areas with the approved cleaner applied to a cloth, not sprayed wildly into the cooker. Keep liquid away from the controller, fan intake, pellet sensor, igniter leads, and electrical connectors.
Do not strip every brown stain. A smoker interior will remain dark. Clean means no loose carbon, standing grease, rancid residue, blocked airflow, or debris ready to land on food.
Step 7: clean the temperature probe
The small metal sensor inside the cooking chamber tells the controller how much fuel and air to supply. A thick grease coating insulates it and can contribute to misleading readings.
Wipe the cold probe gently with a damp cloth and mild cleaner approved for the grill. Do not bend it, scrape it with metal, or soak its connection.
If the displayed pit temperature still differs greatly from a reliable grate-level thermometer after cleaning, confirm probe placement and calibration procedures in the manual. Pellet grills cycle above and below a set point, so compare averages rather than one instant.
Step 8: inspect the hopper and pellets
Look for sawdust at the bottom of the hopper, swollen pellets, bridging, and moisture. Healthy pellets are hard, glossy, and snap cleanly. Damp pellets become soft, crumble, and can swell inside the auger.
Empty the hopper using its cleanout door if equipped. Vacuum loose sawdust only with the cooker unplugged and according to the manual. Keep hands and tools away from an auger that could move.
Store fuel in an airtight pellet storage container, not an open paper bag on a damp floor. The guide to pellet grill vs gas grill explains why fuel condition affects convenience as much as flavor.
Do not leave pellets in the hopper for months through humid weather. Whether they survive depends on seal design and climate, and clearing a swollen auger is harder than emptying good fuel before storage.
Step 9: inspect seals, exhaust, and exterior
Check the lid gasket for loose sections, grease saturation, and torn fibers. Clean it by the manufacturer's method and replace it when it no longer seals.
Inspect the chimney cap, downdraft channel, and rear vents. Soot and grease reduce the intended exhaust area. Preserve the factory gap under an adjustable chimney cap rather than tightening it down because smoke escapes there.
Wash powder-coated exterior panels with mild soap and water. Use a stainless cleaner only on compatible stainless surfaces and wipe with the grain. Never direct a pressure washer at the grill. Water can enter the hopper, controller, motor, and electrical connections.
Check casters, shelf bolts, power cord, and probe ports while the cooker is clean and easy to handle. Maintenance is cheaper when a loose fastener is found before it becomes a bent shelf.
Step 10: reassemble and run a short test
Replace the firepot if it was removable, then the heat baffle, drip tray, liner, and grates in the correct orientation. Confirm that the grease outlet remains open and no foil blocks the tray edge.
Refill with dry pellets. Plug in the cooker and run the manufacturer's startup procedure. Watch for normal ignition, clean exhaust, and stable pellet feeding. If cleaner touched an interior cooking surface, follow the label and manual for any rinse, dry, or burn-off requirement.
Do not improvise a maximum-temperature burn for an hour. Excess heat can bake residue harder, damage coatings, or ignite grease missed during cleaning. Use the model's approved seasoning or burn-off cycle.
A full pellet-grill cleaning demonstration
Smoked BBQ Source's current video shows routine cleaning, a no-chemical deep clean, a chemical deep clean, firepot access, and reassembly on multiple pellet smokers. The useful detail is how little force is needed when the right scraper and vacuum do the work.
What to do after a grease fire
Turn the grill off only according to the manufacturer's emergency guidance and keep the lid closed when that is the safe model-specific response. Do not throw water on a grease fire. Water can spread burning fat violently.
Once the incident is completely over and the cooker is cold, unplug it and inspect every grease-path component. White ash inside can be evidence of a fire. Remove food, grease, ash, damaged liners, and burned deposits. Check wiring, paint, sensors, gaskets, drip tray, baffle, and firepot for heat damage.
Contact the manufacturer before reuse when flames reached the hopper, wiring, controller, or exterior, or when any structural part warped. Cleaning residue does not prove the cooker remains safe.
Prevent the next event by keeping the drip tray and drain clear, avoiding wrinkled liners, completing shutdown, and checking the firepot before ignition.
What not to do
- Do not vacuum warm ash.
- Do not use water on burning grease.
- Do not pressure-wash the cooker.
- Do not spray cleaner into the firepot, hopper, auger, controller, or fan.
- Do not use oven cleaner unless the manufacturer approves it for that exact surface.
- Do not cover required airflow gaps with foil.
- Do not cut power before the shutdown cycle finishes.
- Do not restart over a pile of unburned pellets.
- Do not polish away sound protective coatings.
- Do not assume every removable part is dishwasher-safe.
Troubleshooting after cleaning
| Symptom | Check first | Next action |
|---|---|---|
| Grill will not ignite | Firepot, igniter, dry pellets, power | Clear excess fuel and use manual diagnostics |
| Temperature swings | Probe cleanliness, firepot ash, pellet quality | Clean, refill with dry fuel, observe a full cycle |
| Grease leaks | Tray orientation, drain, level, liner folds | Reinstall and clear the grease path |
| Ash on food | Barrel ash, fan area, pellet quality | Vacuum cold interior and use sound pellets |
| Black dirty smoke | Grease, airflow, smoldering pellets | Shut down safely, clean, inspect combustion path |
| Smoke from hopper | Shutdown history, pellet dust, auger | Follow manufacturer hopper-smoke instructions |
| Hot spot | Baffle damage, pooled grease, blocked edge | Correct tray and baffle installation |
Cleaning is not a cure for every error code. Motors, igniters, fans, and sensors fail. Once ash, grease, fuel, and assembly are ruled out, use the manufacturer's diagnostic process instead of replacing parts by guess.
Cleaning before a long cook
An overnight brisket or pork butt deserves a cold firepot and a clear grease route. Deep-clean before the cook when the grill is close to its service interval, not at midnight after ignition fails.
Run the smoking calculator before you start so the plan includes the full cook and rest. Long burns produce more ash, and fatty cuts send more grease to the tray. Inspect pellet supply, bucket capacity, and drainage before loading meat.
The how to season a new smoker guide covers the first burn on a clean cooker. Seasoning and cleaning are complementary: one protects clean metal, while the other removes loose residue and fire hazards.
The 30-minute deep-clean routine
Once the grill is cold and unplugged:
- Remove and brush the grates.
- Discard the cold liner and scrape the drip tray.
- Clear the grease drain and empty the bucket.
- Remove and scrape the heat baffle.
- Vacuum the barrel, firepot, and accessible ash pockets.
- Wipe the internal temperature probe.
- Remove loose lid flakes and heavy grease.
- Inspect pellets, hopper dust, seals, and exhaust.
- Reassemble in the photographed orientation.
- Run the approved startup and confirm normal operation.
The first attempt may take an hour because every part is unfamiliar. After two or three sessions, the same job becomes routine.
The maintenance habit that matters most
Do not wait for an error code, grease leak, or frightening cloud of black smoke. Look at the firepot and grease path before a long cook, brush the grates after food comes off, and schedule the deeper clean by burn hours.
A pellet grill is easiest to own when ash stays dry, grease keeps moving downhill, pellets remain hard, and air holes stay open. Thirty minutes of cold maintenance protects the next twelve-hour cook and makes the controller's job much simpler.
Related
How to Season a New Smoker Before the First Cook
Season a new offset, charcoal, pellet, or electric smoker safely with a proper clean, thin oil coat, controlled burn-in, and first fire test.
How to Smoke Pork Loin Without Drying It Out
Smoke a juicy pork loin at 250°F with measured seasoning, mild wood, correct probe placement, and a USDA-safe 145°F finish.
Pellet Grill vs Gas Grill: Which Should You Buy in 2026?
Compare pellet and gas grills on flavor, searing, speed, upkeep, fuel, weather, and real cooking habits before choosing the right backyard cooker.